Monday, 28 February 2011

Monday Makery - Gabe's Easy Raisin Sponge

Making a sponge cake fulfils many things including keeping little hands busy on a rainy afternoon  (or any time really), and having a focused thing to do together that results in a home-made treat.
For me personally (as a non-baker) the greatest fulfilment is baking a cake that actually works.
This is a doddle!

My son and I now know this recipe off-by-heart.
He tells me the amounts each time we do the weighing...that helps, as I can forget!

I really hope my son will always know how to bake this cake...and I can imagine it will impress quite a few girls when he's older.


The recipe is in actual fact based on your simple Victorian Sponge recipe with a generous handful of raisins. Simple as that.
It was Gabriel who decided to add the raisins. They sink to the bottom of the cake -  the WI probably wouldn't approve but it's delicious!

I probably don't need to tell you the ingredients...
  • 150g softened butter or marg (olive oil spread is fine too)
  • 150g caster sugar (or any other sugar you may have)
  • 3  medium eggs
  • 150g self raising flour - (wheat free flour works too - Dove's Farm do a good one)
  • A generous handful of raisins

    In the oven on 180 for only 25 minutes.
It really is a fuss-free bung ingredients together kind of cake - make a mess and hey presto there's a sponge cake.

It's the making and having a giggle that's important. Oh, and eating the lot before Daddy comes home!

Ping, just out the oven! Nom Nom.
x

Wednesday, 23 February 2011

Woohoo for Belle & Boo

We know our passion for all things Belle & Boo is going to be a long-term love affair, and for our children the illustrations of Belle & Boo will be the images that will stay with them from childhood, just like Beatrix Potter and the Flower Fairies did with us.

We have added to the range of Belle & Boo in our boutique, with many more art prints, including some boyish themes:


Belle & Boo mounted art prints My Paper Plane £32.80, Pirate Party £56.30  My Paper Boat £32.80,      I Like Your Hat £20.50,
With background wall stickers Cowboys & Indians from £59.99
A beautiful selection of prints featuring Belle in various activities, perfect prints to adorn the walls of a girls bedroom:

Belle Feeds the Chicks £32.80,  Belle & Boo Fly a Kite £36.00, Hello Chick £32.80, Parade Wall Sticker from £20.00


The art prints are mounted giclée prints of various sizes, signed by the artist Mandy Sutcliffe.  They are sure to become collectable works of art! View the full range of Belle & Boo art prints here

If it's a personal family heirloom you're looking to create then the Family Tree Poster is a beautiful way to display family photos:

Family Tree Poster medium £16.00, large £30.00

And for gifts the lovely badges are now in stock:


Belle & Boo badges from £2.00

With further delights of the Belle & Boo range including Clothing, Cushions, Wall Stickers, Book Plates, Bags, a Dress-Up Doll and the Bubble Before Bed Book, and lots more to come, we are completely smitten and utterly grateful to Mandy Sutcliffe for all these beautiful creations.

There's some spring dresses about to arrive and the oh-to-be-coveted Boo quilt available soon!

Sign up for the newsletter on the left to keep updated with all the spring arrivals in the Sisters Guild Boutique!

Tuesday, 22 February 2011

Hucklebones spring / summer 2011 collection is here!


Like a fresh spring breeze the Hucklebones SS11 collection has arrived at the Sisters Guild Boutique.  With fabrics to suit the spring / summer season - ditsy checks, fine cotton voile, soft fluid silk, crisp cotton and seersucker.

And as we said before...

We love the beautiful dahlia print and the colour palette inspired by petals. With colour names such as Wedgewood Blue, Walnut, Buttercup, Sunshine and Peony, you immediately know these pieces are delicious, delicate and would look beautiful on your girls. With shapes that reflect feminine grace and movement:  A-line dresses, neat ‘penny collar’ blouses, bows and scalloped hems.

The collection takes inspiration from the fauna and flora of the garden.  Oh yes, we can picture the garden that inspired such a collection - a delicate English garden with a few bursts of colour.  It would of course be a garden with a lawn with space to run free, for girls dressed in soft silk dresses, floaty tops and jumpsuits, to play on picnic rugs, chase balloons, do cartwheels and possibly end the day in a beautiful sleepy heap with a crumpled dress and tangled hair.


That's the vision that the spring / summer Hucklebones collection conjours up for us.

Take a look for yourself and feel a hint of the gentle spring that will soon be here!

View the collection here

Monday, 21 February 2011

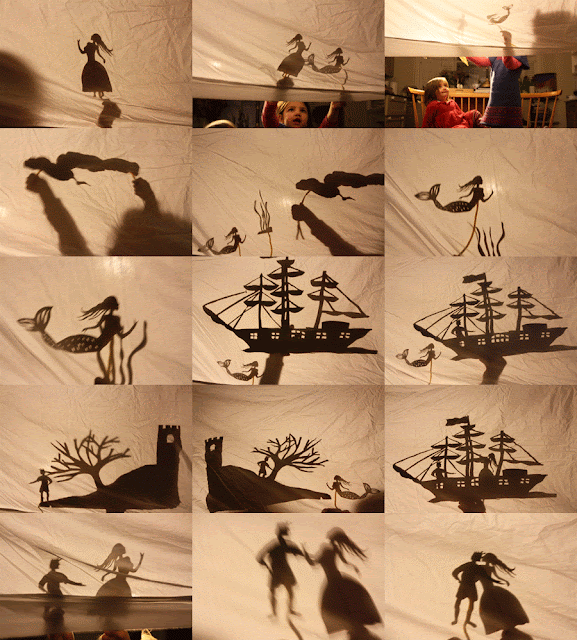
Monday Makery - Shadow Puppets


Sessi (Sophia) was remembering on the way to school the days when the sun was shining brightly and we would walk along making shadow puppets on the wall, telling a story along the way. Last summer it became part of our morning routine on the walk to nursery. So much so we ended up having to leave 10 minutes early to allow time for our shadow stories. The sun isn't shining bright enough now for our morning tales so I thought we would make some puppets at home to make stories together that way. 
Shadow puppets are a great way to encourage story telling with children. This is especially true for children who have not yet learnt to read by themselves. Each story is limited only to the puppeteers' imagination. There are endless stories to imagine, endless puppets to make and hours of fun to be had retelling fairytale classics not to mention those brilliant and often comedic tales children like to tell quite often adding their own twist to a well known story.

It's fun to recreate the characters from a favourite book; Little Red Riding Hood, Rapunzel, or The Gruffalo. Though it's equally if not more fun to create a random selection of creatures and people and let the children use them to conjure up a story of their own imagination.

As the puppets are so simple to make you will no doubt keep adding more and more characters to your collection and this is what makes these creations all the more wonderful.

Children who are too young to play puppeteer themselves will love the new way of having a story told and what a great introduction to theatre too. Oona who is not yet two is too young to be able to recount a story but she loves the way the shadows move. She walks around with a puppet in hand squealing with delight 'marmai' every time the mermaid shadow appears on the wall or floor.


What you'll need:
  • card - pizza or cereal boxes are ideal
  • scissors
  • pencil
  • pipe cleaners or lollipop sticks
  • a spotlight or lamp with the shade removed
  • an empty wall or a sheet to hang


Here's how:
  • draw outlines for each character, animal or scene you want to use on your card and cut each out carefully.
  • using sticky tape secure a pipe cleaner to the back of each shadow puppet to create your stick. If your character feels too heavy twist two pipe cleaners together before sticking.
  • hang a sheet from the ceiling using small tacks or knot each corner of the sheet and tie string around the knots using the string to hang the theatre from more hidden corners of the room. If you chose you can project the shadows onto an empty wall. Though this may make it harder to give a sense of there being a stage and an audience. A very long sheet of greaseproof paper stretched across the room and taped to the wall either side also makes a great area for shadow puppet theatre. To make a more permanent theatre albeit a smaller one an opened cereal box with a rectangular frame cut from the front with greaseproof paper stuck inside the frame makes a fantastic portable theatre that won't need to be taken down.
  • Sit your lamp or spotlight behind the sheet or paper leaving enough distance for the puppeteer to be able to stand and perform and let the show begin.


Once upon a time ..........................


................and they lived happily ever after.

Wednesday, 16 February 2011

Wednesday Woos the Designer or Architect in you!

You can create something new every day at your own kitchen table...desk, floor or rug! If you harbour secret desires to design, invent and construct, satisfy your inner designer or architect with the wonders of Miller Goodman, Playplax and Rosie Flo

Miller Goodman PlayShapes are made of rubberwood and feel incredible in your hands. This set of 74 shapes allows you to become the master of some stunning creations, characters, creatures, buildings and landscapes.

Playplax is the new Lego in our household. We gather round to slot and stack and create colourful constructions, then sit back and admire. They are a pleasure to play with, way past the kids are in bed!

And for paper and pen creations...
In the world of Rosie Flo heads, arms and legs are missing and it is up to you to add these body parts, along with a rainbow of colour. The posters are big at 54 x 40 cm - you and your budding little designers can create a unique piece of artwork to give as a gift or keep and frame as a memento of your childs' unique imagination.

The Sisters Guild Let's Create section is full of those things that are ideal to have tucked away in a cupboard, ready to pull out and turn a dull day into an inspiring one.

10% off for the rest of february using this code: CREATE

*offer valid on Let's Create category only, until midnight Monday 28th February 2011

Monday, 14 February 2011

Monday Makery - I Give You My Heart


Love for breakfast. 
Love for tea. 
Love for you, 
Love from me!


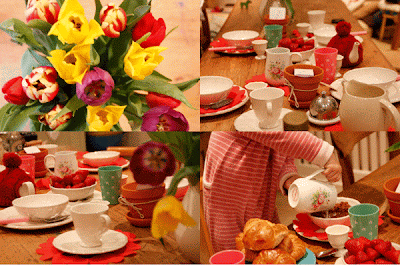
Breakfast in our house is mostly the rushed bowl of cereal and a slice of marmite toast in hand rushing out the door for the school run. Whilst weekend breakfasts are a leisurely and might I add messy feast of pancakes. As valentines falls on our most hurried of hurried days we brought ours a day earlier and started the day with an epic feast of croissants, strawberries, blueberry pancakes, those forbidden chocolate cereals, boiled eggs and toasted soldiers and a table scattered with hearts, flowers and a few little surprises!


The heart table decorations are made using paper napkins and it's as simple as a few folds a few snips and voila! Follow the directions here. They also made fantastic crowns. 


Underneath their plates were hidden little valentines cards. I couldn't find any cards that I felt had the right sentiment, a card with a message of love that was suitable for children and I found this great idea here. I love these clever little envelopes that open up revealing their secret messages inside. For Oona who is too young to read I placed a picture of us together as a family, a sweet one of us lying on the grass together. Rather than just an 'I love you' message, which being said so much between us would not mark the day as extraordinary, I placed an invitation to an evening together. I wanted the day to be filled with things we love to do with the people we love. I wanted a day to remember. So, inside were tickets to Cirque de Soleil!


I love the idea of giving people seeds as a gift. Something to plant that can be nurtured, that will grow, blossom and just like love grow bigger every day. The girls were both given their own little pot with a personalised packet of seeds for them to plant. 


Hopefully their 'love in the mist' will grow strong in their pots ready to be planted in the garden of our new home.


What would a Sunday be without the all important aroma of something wonderful baking in the oven. Another of the girls things they love to do. We made gingerbread people and gingerbread hearts. The recipe is an easy one to follow, easy to make and easy for children to decorate.


What you'll need:
  • greaseproof paper
  • cookie cutters
  • 130g butter at room temperature
  • 110g soft brown sugar
  • 375g plain flour
  • 3-4 tsp ground ginger depending on your own taste
  • 1/2 tsp of ground cloves (optional)
  • 1/2 tsp of ground cinnamon (optional)
  • 1 tsp of bicarbonate of soda
  • 1 egg yolk (save the egg white for the icing)
  • 280g golden syrup - almost 2/3 of a standard 474g tin 
for the icing you'll need:
  • 240g icing sugar
  • 1 egg white
  • 2 tsp lemon juice
  • 2 tsp plain flour
  • food colouring

How to:
  1. Preheat your oven to 160C (fan assisted)
  2. Line 2 baking trays with greaseproof paper
  3. Mix together the butter, sugar and egg yolk in a bowl. (you may find it easier to use an electric mixer as it is quite a heavy mix by hand)
  4. Stir in the bicarbonate of soda, ginger and cloves and cinnamon.
  5. Start adding the flour and syrup bit by bit to make sure the ingredients are equally mixed together.
  6. Knead the dough until it feels smooth. You can do this in the bowl if its large enough or on the table with a little sprinkled flour to prevent it from sticking.
  7. Cut 2 sheets of greaseproof paper and sprinkle one with a little flour placing half the dough on top.
  8. Placing the other sheet of greaseproof paper on top roll out the dough until it's a lovely flat sheet about 1/2 thick.
  9. Using your cookie cutter start cutting your shapes and place them onto your pre-lined baking trays.
  10. Bake in the middle of the oven for 15 minutes and leave to cool on their trays.
For the Icing:
  1. Mix all the ingredients together in a bowl adding enough juice to make it spreadable. If you'd like to use different colours to decorate your gingerbread men divide the mixture into separate bowls and add your food colouring accordingly.
Decorating the gingerbread men:
  1. Spoon the icing mixture into a freezer bag or a strong sandwich bag.
  2. Cut the tip of one corner and gently squeeze the icing onto the cooled ginger bread shapes.
Yum Yum!

These 'sweet' hearts are a beautiful idea for hanging treats on the bedroom door. I love how one is not complete without its matching partner. You can fill them with anything you like. The girls and I filled them up with home-popped popcorn. We hung them from the mantle ready to pick up on our way to the theatre, our little treat for the interval.


Now I've discovered how to make them I shall be doing them again; hanging them up ready for an evening snuggling up together with a favourite film. I think they would make beautiful party bags too and what a wonderful way to carry confetti ready to throw at the bride and groom at a wedding (though do make sure you're a guest, I would not recommend throwing confetti at a random couple newly married!). You can see how to make them here


With Love
x
Friday, 11 February 2011

IMAGINE Children's Festival, Southbank Centre

Wondering what to do over the next 2 weeks of February?  Musicians, storytellers, comedians, puppeteers and dancers are coming to the Southbank Centre for the IMAGINE Children's Festival 12- 27 February 2011

We've got tickets for the Long Nose Puppets' new show Penguin (based on the award-winning book by Polly Dunbar).  I adore this book and am looking forward to seeing how they turn it into a show.  Just read that the music is by Tom Gray of Gomez.  I'm probably going to enjoy it more than my 3 year old!


With some amazing FREE events  too including Shoebox Living, an exhibition by Kids Company, and Bookworm Babies with Dr Octopus and the Wheels of Steel!  I also like the sound of the family dance event with swing band Laura B and the Moonlighters. Might see you there for some parent-style grooving that embarasses the kids!

Check the IMAGINE festival site for full listings & info

Thursday, 10 February 2011

Marimekko Converse, I'm in love!

Marimekko and Converse have collaborated...take a look at these beauties!

Two things I've been passionate about since I was about 12 years old are Marimekko and Converse. I dreamt of working for Marimekko and have every magazine cutout and stacks of fabric. Converse trainers, well, I live in them!

Now they are coming together - Marimekko and Converse - it's like seeing 2 old friends get together.

I'm going to suss out where we can buy them - in time for the spring hopefully- and will get back to you!

In the meantime, take a look at this little film about Marimekko and Converse, shot in Helsinki.  Just look at the fabric!

And if you're dreaming of Helsinki this Paumes book is so inspiring:
Finland Family Style

Wednesday, 9 February 2011

Love is in the air for wooing wednesday


With new arrivals of Mae wall stickers from Australia as well as the new collection of Danish homeware from Rice DK, we are singing and dancing songs of love...my favourite being Love is in the Air! 

We've created a whole new LOVE section of our boutique - full of things for little loves and big loves in your life.

for messages of love, mini cards & envelopes, £3.00

With 10% off the LOVE section until 14th February 2011, using code LOVESONG  

Tuesday, 8 February 2011

Dandy Star sunshine

The new Dandy Star T-shirts have arrived today, most appropriately as the sun is shining upon us.

They bring with them bright colour and messages of LOVE, DAZZLE, SAVE THE WHALE and MAGIC with a vision of spring when we can peel back the winter layers and feel some warmth on our skin.


View the NEW Dandy Star T-shirts here

Monday, 7 February 2011

Monday Makery - love strings


Valentine's Day is coming and as I'm the queen of leaving things til the last minute I wanted to plan a day after which we fall asleep with our hearts full. So this week I'm starting to pull together all my creative ideas to  make a day extraordinarily love-ly. 
Saint Valentine's Day traditionally clelebrates romantic love but I think its a great excuse to remind all of those we love how we feel. My Husband is away for the week of Valentines, escaping all the potential pitfalls of choosing that oh so perfect gift, that token that says 'I love you' more than the words, the gestures we share all the other 364 days of the year. I have left plenty of hints, with magazine pages left open on the coffee table and commenting on how beautiful 'this' and 'that' is.
So, it'll be me and my girls and my mama too. With Valentine's Day falling on a monday we're going to celebrate over the weekend with a day full of suprises, treats and a house decorated with symbols of love. Look out for next weeks 'Monday Makery' to see more of our Valentines creations. In the meantime why not try these hanging heart strings. They're easy to make and its a great way for children to start to think about the meaning behind that little-big word 'love'.


You'll need:
  • coloured card
  • heart templates or heart cookie cutters in various sizes
  • scissors
  • sticky tape
  • wool or string

How to :
  1. Measuring the width of paper you will need for your heart template fold the card back and forth like a concertina. This will save a lot drawing and cutting.
  2. Draw around your cookie cutter or template to create a guidline for cutting. Younger children may find it easier to draw around the inside of the cutter rather than the outside.
  3. Cut along the outline of the heart. If you have any childrens' craft scissors these would be a great way to give the hearts a pretty edge.
  4. Lay your hearts across the table, leaving equal space between each shape, and place a long strand of wool over the top.
  5. Stick the wool using sticky tape. If you'd like to, you can fold the sticky tape back on itself to make it 'double-sided' and stick another heart on top to make them look a little neater though this is a little fiddly for little hands.
  6. Continue adding your decorations along the wool until your garland is the desired length. Then cut the length and hang. The strings below were made to hang vertically but if you'd prefer to hang horizontal garlands simply stick the hearts left to right rather than top to bottom.
You can personalise your garlands with other simple images. Make templates of your family, pets and those you hold dear. Perhaps write messages on each heart....'love is.....' , 'I love your.....' .
Whilst chosing the colour of the card I asked Sessi (Sophia) what colour came to mind when she thought about how much she loves Oona. "White" she said. So, Oona was white, Daddy was blue and orange and I was yellow. 
Each of us had a different coloured garland with different messages for the all those things we love about them.


Our garlands look so beautiful hanging there as a reminder of  those we love and feel most strongly for and I think there'll be there for a long time. And perhaps they should. It shouldn't be only Valentine's Day that we make such efforts to tell those we love just how much we really truly deeply do. However, forget about it and you'll not be forgiven!
Our garlands are now extending as Sessi has been thinking about all the people she loves. It'll be interesting to see what colours those people will be.


    Thursday, 3 February 2011

    Happy Chinese New Year of the Rabbit

    image courtesy of let's be brief blog
    image courtesy of Bustle & Sew blog

    We welcome the Year of The Rabbit, with a forecast for more tranquillity and balance. Let there be peace on Earth and let it begin with me is the Rabbit motto.

    I've always been fascinated with Astrology and the Chinese Zodiac with it's history of intriguing tales: a grand feast for Buddhas birthday or a celebration for his departure from this world where only 12 animals showed up at the festivities; the story of Jade Emperor who invited the animals to participate in a race, the prize being a coveted position on the Chinese Zodiac calendar.

    There's a lovely children's storybook which I recently found in the library, The Great Race - The Story of the Chinese Zodiac


    I'm a Rabbit myself and I've just read descriptions of the Rabbit being 'friendly, homely and diplomatic' but I shall also add 'a little bit daft' to that! I am always drawn to all things rabbity. Boo of Belle & Boo is very charming and my favourite AW10 clothing fabric is the Paperchain Rabbit print by Hucklebones.


    Leila Lou has made a rabbit called Florence and just like the character of the Chinese Rabbit she really does like being embraced and spending some lovely time at home and with friends!


    Happy rabbit times for all!

    x

    Wednesday, 2 February 2011

    Woo - hop hop hop

    It's Wednedsay and we want to woo you with our hop hop hop collection of hand made jewellery from Paris.  We are completely enamoured!


    View the hop hop hop collection here

    La Creatrice behind the collection is Clementine du Pontavice.  On her travels in Nepal, China, Chile and Bolivia she was inspired by beautiful objects, particulary in the market stalls 'full of pearls and multicoloured bracelets, by the saris, the little bells, and all the woman wearing so many jewels.' Her imagination blossomed and hop hop hop was born - a collection of necklaces, lockets and bracelets.

    A locket is a piece of jewellery that speaks of love, celebration and memories.  It's a beautiful way of wearing a secret, a keepsake, a charm or a lock of hair. My husband surprised me at Christmas with the gift of a locket - which was enough to make me flutter - but tucked inside is a perfect blonde curl of my baby boy (who is now 3). It's so lovely to wear - a celebration of 3 years of being a mum and a way to treasure my boys' babyhood.

    The lockets come in 3 different sizes, on different chain lengths:
    Mini has a 1cm locket on a small chain of 44cm  designed to sit at the collar line.
    Moyenne has a 2cm locket on a long chain of 87cm designed to sit below breastline.
    Maxi has a 3 cm locket on a long chain of 76cm designed to sit on the breastline.

    Discover clouds and birds too, in such beautiful colours.