

Showing posts with label recipe. Show all posts

Monday, 8 August 2011

Monday Makery - Lollibops


It's been a while since we've brought a recipe to the makery so in the spirit of Willie Wonka and with Lollibop in our minds we've been concocting lollipops with a twist. These are fantastic to make, with baking, bashing, and designing some bright stain glassed biscuit lollipops.
The smell of almond and lemon drifting through the house is pretty delicious too. These lollibops make great party bag treats and look pretty impressive on a party table too.

here's what you'll need:
  • wooden lollipop sticks
  • 200g individually wrapped sugar drops
  • hundreds and thousands
  • 125g unsalted butter - softened
  • 1 lemon
  • almond essence - 1 teaspoon
  • 110g caster sugar
  • 250g plain flour
  • 2 eggs
  • greaseproof paper
  • rolling pin


Here's how:
  1. To make the biscuit dough put the butter, 1tsp almond essence, 1 egg and the grated rind of one lemon into a bowl and mix it all up with an electric mixer, start adding the flour little by little sifting as you go. 
  2. Now you'll need to kneed; sprinkle an ample amount of flour over the table and kneed your dough adding more flour, sprinkle by sprinkle if it starts to get too sticky.
  3. Time to cool off; cut two sheets of grease proof paper and roll out your dough between the two sheets. Once its rolled evenly (about 1/2 centimetre thick) place in the fridge to cool for about half an hour.
  4. Whilst waiting for the dough, you can get bashing the sweets. Unwrap the sweets and separate by colour. Place the sweets into a sandwich bag, wrap in a tea towel and place on top of a chopping board (to protect your work surface) now take your rolling pin and bash bash bash with all your might! Repeat the process with all the different colours. 
  5. Preheat the oven to 180C or 160C fan assisted.
  6. Take your dough from the fridge and using the largest of your round cutter cut out as many rounds as fits onto the sheet of dough. You can re-roll the dough again to make more later.
  7. Move each round onto another baking sheet.
  8. Now using your other cutters place the second largest on top followed by the next largest and finally your centre circle, we used a heart for some of our centres and stars for others.
  9. Remove the dough from the first inner circle and then the dough from the middle. Leaving two rings within the whole circle. Repeat with the other rounds.
  10. Brush with egg white and sprinkle with hundreds and thousands then carefully slide a lollipop stick underneath and into the central space.
  11. Now pop into the oven for 10 minutes.
  12. Remove from the oven and fill the gaps with your bashed up sweets. Put them back into the oven for a further 5 minutes.
  13. Remove from the oven and leave to cool on the trays
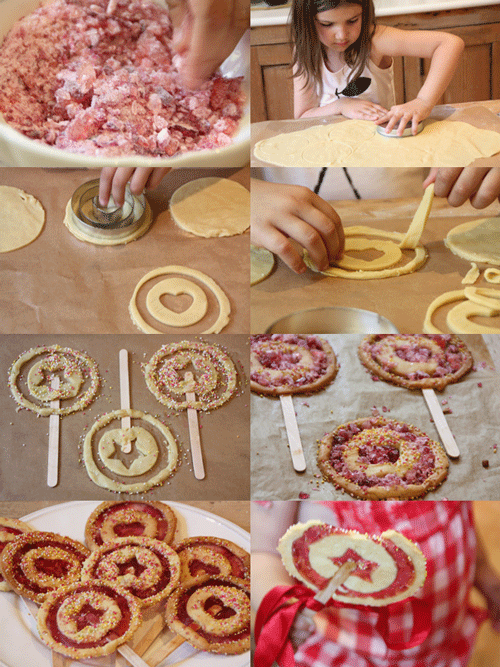
I tied a ribbon around the stick to finish off the our lollibops. I think they look pretty yummy. The biscuit has a delicate lemon and almond taste and just the perfect crunch. The stained glass centre cracks in the mouth and the combination of the two is really delicious.

Happy baking! yum yum


We have more Monday Makery craft & recipe ideas here.

If you would like to share some ideas as a guest blogger on the Monday Makery we would be very excited to hear from you. Use the contact form on our main website here.

For behind the scenes photos of Sisters Guild we have the gallery of the A-Z of Sisters Guild here.

www.sistersguild.co.uk

Monday, 16 May 2011

Monday Makery - Banana Bread

There's a highly recommended cookbook that we use regularly at home. It's The River Cottage Family Cookbook and it's full of simple recipes with lovely pictures
Gabe has even started sitting with the book and flicking through asking questions and requesting to do certain recipes, which fills me with joy. It has definitely become THE family cookbook and is very reliable for all the basic recipes and cooking tips.


One of our favourite recipes is the Banana Bread.  We've adapted it a little - swapping the caster sugar for Fruit Sugar and Self-Raising flour for Gluten Free Self-Raising flour so it is less likely to flare up Gabe's Ezcema.


Ingredients:

Dried Apricots 75g
Sultanas 75g
Lemon 1
Unsalted butter 100g (we use olive oil spread and it works fine)
Caster Sugar 125g (can substitute with Fruit Sugar 100g)
Eggs 2 large
Bananas 3 large ripe
Self-raising flour 200g (Gluten Free Flour can be used - Dove's Farm do a good one)


Method:
  1. Preheat Oven to 160 degrees C / Gas Mark 3.  Line the loaf tin with baking parchment.
  2. Chop up apricot pieces and grate the lemon zest. (we actually skipped the lemon zest bit)
  3. Cream the butter and sugar with a wooden spoon until creamy.  Beat in both eggs.  Add the dried fruit and lemon zest (a squeeze of a lemon is just as good - my boy likes the 'geeezing')
  4. Mash the bananas well with the fork and add to bowl.  Stir well.
  5. Sift the flour into the bowl and fold into the mixture.
  6. Scrape the mixture into the prepared tin.  Put into the oven for 50 mins - 1 hour.
  7. When it's out of the oven leave to cool in the tin for 15 minutes before you turn it onto a wire rack.
  8. Slice, grab & enjoy
It fills the house with such a delicious smell.
We always have to scoff some when it's still warm, though we know that banana bread is actually even more tasty the next day - if it lasts that long!

Thank you River Cottage Family Cookbook

We have more Monday Makery craft & recipe ideas here.

For behind the scenes photos of Sisters Guild we have the gallery of the A-Z of Sisters Guild here.

Monday, 2 May 2011

Monday Makery - Rustic Pesto

This Monday Makery is a foodie one, a recipe for pesto in a rough and rustic style.
The recipe is inspired by our Uncle Rupert who transformed the White Hart Inn at Widcombe in Bath into a fantastic restaurant and hostel.  The food at the Inn is delicious and for our Great Aunt's 80th we were all treated to the delights of the menu.  My husband came away with the inspiration to make 'Rustic Pesto' - a pesto that is roughly chopped rather than blended.  It has since become a family favourite.


Ingredients:
  • Bunch of fresh basil
  • 3 garlic cloves (or more or less to taste - we like it very garlicky!)
  • 60g Parmesaan Cheese  - grated (amount can vary depending on how cheesy you like it)
  • Pine Nuts - a large handful
  • Almonds (optional)- a large handful
  • Olive Oil - enough glugs to make it a loose mixture
  • Salt & pepper

Method:
  1. Toast the nuts in a dry heavy-based pan.
  2. On a chopping board or ideally in a mezzaluna roughly chop the nuts and add to a large bowl. (We sometimes add almonds along with pine nuts just to vary the taste)
  3. Rougly chop the basil and add to the bowl.
  4. Use a garlic press for the garlic and add to the bowl.
  5. Grate the Parmesaan and add to the bowl.
  6. Stir all the ingredients together in the bowl along with plenty of olive oil.
  7. Add salt and pepper to taste.

The pesto can be served simply with crusty bread to dip in a tapas style or it can be added to pasta.
If you do want to make a toddler-version you could alter the garlic amount and blend to a smooth paste.
It really is delicious and very versatile.
We've added it to home-made Pizza and it is also great with Roast Chicken & Roast Vegetables.
It can keep in the fridge for up to 3 days.....but it never lasts that long as it's always scoffed very quickly!


We have more Monday Makery craft & recipe ideas here.
For behind the scenes photos of Sisters Guild we have the gallery of the A-Z of Sisters Guild here.