

You'll need:
- Card
- Pencil
- measuring tape
- ruler
- scissors
- fabric
- string
- elastic
- ribbon
- and either fabric glue or a needle and thread or a sewing machine. The ones I made here I used fabric glue for as it seemed a far quicker option than pinning and sewing. (always the path of least resistance)

here's how:
- I first measured Sessi's wingspan - the length from one wrist to the other across her shoulders, and then the 'drop' for the length of the inner side of the wing
- Dividing the wingspan into 2 and adding an inch for looseless and a little room for growth I drew a template onto card and cut it out. I first measured the top 17" then the drop 21"and using a pencil tied to string drew a curved line between the two. The curved line stopped short of the length I wanted but it was a good guideline to have in place. You will only need one template as you can flip it over for the other side.
- I then decided on the length and width for each plume and drew a template for a small row cutting it ready for measuring and cutting the fabric.

4. I discovered that each wing fits perfectly onto a pillowcase side so found an old pillowcase that would have ended up in charity - which is where I will be looking for the next fabric.
5. I drew around the stencil of each wing with pencil onto the pillow case and cut it out using pinking shears to prevent any fraying. It also gave the wings a beautiful textured edge.
6. Then having chosen my fabric for the plumes - I raided the offcuts in the haberdashery department. I cut out the plumes using the card template. Some in rows and some single ones too.
7. I layered each plume onto the fabric using fabric glue to stick them on; starting from the bottom and working my way up to the top. Cutting the edges that overlapped as I went. It's a bit like a making a fabric collage.

8. I stitched the wings together at the top about an inch of stitching down towards the bottom.
9. Then I measured the elastic to make a loop around the wrist and sewed it to the top edges of the wings. A loop each side.
10. To prevent the wings from drooping at the back I measured some ribbon to tie around the shoulders. I folded the ribbon in half and stitched the centre of the ribbon to the central part of the back of the wings. I think the ribbon adds a nice touch too.


It might sound like a long project but it was super easy so don't be put off by the 10 steps! You'll be surprised too as to how easy you can obtain all the things you'll need.

I'm now making a bug pair for Gabriel and a pair with shades of white with thinner longer plumes like feathers of a dove for Oona.
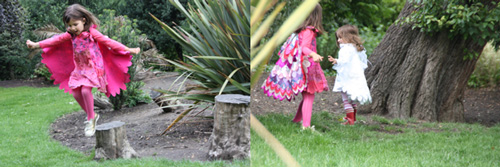
I'm utterly in love with them and i'm sure they'll get lots of play. Great too for all those childrens party costumes. Also lots of my friends are already wanting them too so i'll be making some for birthday gifts no doubt. Its seeing the movement of the wings that is so beautiful especially in the breeze of a summers day.

After a day of flying in the tropical gardens of Battersea park it was time to go home.

I wonder where we'll fly tomorrow?

