
Children love being able to assert themselves and being able to keep independent; doing things by themselves, taking care with their own things and learning the routine of the day gives them a sense of achievement and confidence. Though occasionally there are times when they need a little help and persuasion.
Perhaps like most mums I find there is a particular part of the day that seems to need the most persuasion. It's the part I sometimes find the most difficult and yet when we do it well it is perhaps the most satisfying part - bedtime!
Bedtime; the bath, the pyjamas, the story and then that which should be the gentle stillness of the end of the day can sometimes end up the most chaotic.
Though this is no cure for the chaos and the chorus of 'but I'm not tired!' and 'Can I have five more minutes?' come the bedtime hour this may turn bedtime into something different; with a gift of sleep wrapped in an envelope and alongside a favourite bedtime story. It's a delightful bedtime recipe and a routine that has been invited into our home with a tired eyed bedtime enthusiasm. There is suddenly a calm theatre to the evening, a magical end to the day.

Here we make invitations to the land of dreams. A fabric envelope personalised with a childs name, a place to keep the ingrediants for sleep; pyjamas and a good book. Its easy to make and so utterly satisfying. Both my girls love them and each night they find a book inside which turns bedtime into a beautiful story discovering time....they love opening up the envelope to discover their pyjamas and book and settling down placing the envelope at the foot of the bed ready for the next nights invitation and discovery is such a pleasure for them.....and myself too!

Here's what you'll need:

- paper, pencil and ruler - to create the template
- scissors
- 2 large pieces of fabric
- a button
- embroidery thread
- fabric scraps, ric rac and whatever decorative pieces you might like to include

Here's how:
- Use the template picture above to draw your template onto paper. I used sticky tape to stick four pieces of paper together to get the right size then drew on the measurements.
- Pin you template to your chosen fabric and draw and cut around. Repeat for your second piece of fabric. I chose a thick natural linen for the outer sleeve and then a striking contrast pink for the lining.
- Now you'll need to give both pieces of fabric their envelope shape. Take one of the pieces of fabric and fold up the bottom to create the pouch, right sides facing so it appears inside out or rather the wrong way round. Pin the edges of either side together ready to sew (see picture 1 & 2). Then sew along each side to seal the edges.
- Follow the same process for the second piece of fabric.
- You'll now have two separate pieces which are starting to take their shape and its time to piece the two together. Take your outer fabric envelope and turn right side out. Then place the envelope into the inner fabric pouch (see picture 4).
- use pins to tack the two layers together along both the bottom lipped curve and the upper flap used to close the envelope. You will need to leave a gap of 3-4 inches along one of the straight sides to give yourself a hole to turn the fabric right side out.
- Now sew along your pinned seams. Don't forget your turning space.
- Using the space in the opening turn the fabric right side out. This looks a little odd but rest assured it will all make sense...... just keep following these steps, its nearly finished.
- Lie the fabric flat onto your surface with the inner lining facing upwards. You will see there is a flap at the end where the two pouches are separated. Place your inner lining fabric into the outer lining pouch. You can use a chopstick or the end of a pencil to push the corners into each other.
- Finish off the envelope by sewing along the 'turning space' - the gap left for turning the fabric inside out and the right way round, and voila! A beautiful fabric envelope.
Now for the button:
- decide where your button will go and mark with a pencil. Make a slit on the flap of the fabric envelope and sew along each new edge of the hole.
- sew the button onto to the pouch side of the envelope making sure it lines up with your button hole.
You could sew on a popper if you prefer or perhaps if your children may find a button a bit tricky you could sew velcro for the seal. Velcro would give it that same feeling of opening a real envelope.
Decorating the envelope:
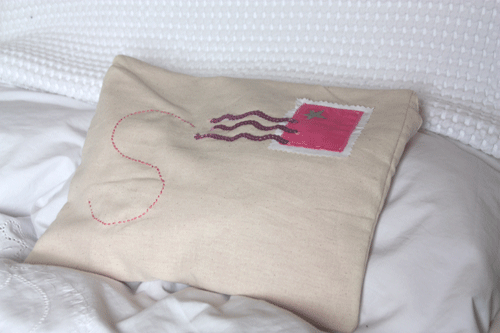
You can use scraps of fabric to create a stamp and ric-rac makes a beautiful wavy line for the post mark. I wanted the fabric envelope to be addressed personally so I 'embroidered' an 'S' for Sessi - I use the term loosely as its just a simple running stitch with embroidery thread. You can elaborate as much as you like with buttons and sequins and whatever you can imagine. Take care in deciding what you'd like to add if you intend on your fabric envelope being machine washable.
These fabric envelopes make wonderful and unique ways of giving gifts too. You can alter the size of the template to make the envelopes larger or smaller depending on what it is you'd like to place inside. The decorations can be as simple or as elaborate as you like, perhaps writing an address on the front: 'climb the stairs, under the pillow, land of dreams.', or sewing on a sillouette cut from fabric for the stamp. You could make them quite surreal and dream-like with patterns and colours reminiscent of childlike dreams. There are so many possibilities.... an invitation for your imagination.

Enveloped sleep!
We hope you enjoy making your own invitations for the land of dreams. We'd love to see some pictures if you do.
We have more Monday Makery craft & recipe ideas here.
If you would like to share some ideas as a guest blogger on the Monday Makery we would be very excited to hear from you. Use the contact form on our main website here.
For behind the scenes photos of Sisters Guild we have the gallery of the A-Z of Sisters Guild here.
www.sistersguild.co.uk
That's so sweet! You'e inspired me to use up an old blanket I have to make personalised cushions.
ReplyDeleteFantastic! We are always so pleased to hear that people are inspired to make their own creations.
ReplyDeleteI'd love to see the finished cushions - we're always looking for people to send us their own makery ideas too!! Perhaps your cushions will inspire others too - I'm curious for sure.
Have fun.