Monday, 15 August 2011

Monday Makery - tablecloth play house


We are constantly making dens in our house. Using sheets, tablecloths and blankets thrown over drying racks, tables and chairs. Each den becomes the perfect hideaway for the girls. A place where they invite their favourite bears and dolls to tea. Its territory for the under four foot and a cozy refuge from the day. Despite there being numerous beautiful 'wendy houses' on the market we've never had one at home, i'm not sure where one would go now, however, we do have three tables in the house! So, here we turn an old double duvet cover into a tablecloth 'wendy house'.  The best thing about it is that there is no need for it to get put away or moved to a corner. We can lay the table as usual. Though I think from now on the girls will want to eat their meals inside their house rather than on top!


here's what you'll need:

  • large piece of fabric - enough to cover your table and touch the ground on all sides. I used an old duvet cover and opened it up by cutting along the seams to create double the fabric. There wasn't quite enough fabric to reach the floor at the back of the 'house' but I trimmed the excess from one of the sides and joined it to the back. 
  • scissors
  • velcro
  • scraps of fabric - enough to create your curtains and your door.
  • ribbons for tiebacks
  • paper and pen - to create your number stencil or name for the front door
  • bamboo pole to give the top and bottom of the window frames their shape and prevent them from sagging


here's how:

  1. Once you've got your base for the house and all the sides touch the floor, measure the doorway and window frames and mark them onto the sheet/base fabric. 
  2. Cut the holes for the doorway and windows using pinking shears to prevent the fabric from fraying.
  3. Cut the fabric for the doorway to fit with an extra inch either side and and extra inch above the top of the frame. Do the same with a rectangle of fabric for the windows making sure you add an extra inch either side and extra inch for the top. 
  4. Cut up the middle of your window fabric with pinking shears to create a 'pair'of curtains leaving an extra 2 inches at the top where the curtains will hang.
  5. Now cut a length of velcro to fit the top of the door and another two pieces to fit above the windows.
  6. sew the velcro in place with one side onto the fabric house and the other onto the fabric door and curtains.
  7. Cut 4 lengths of ribbon for your tiebacks and stitch to the sides of the window frames.
  8. To prevent the bottom and the top of each window frame from sagging it will need some framework added. You can do this with cotton covered boning or as I did, use bamboo pole. I hemmed the top and bottom of the frames by folding over 1 1/2 inches of the fabric frame and sewed along the edge. This created a long pocket for the bamboo poles (cut to size) to slide into.
  9. The girls wanted to add numbers to the door so I drew a '6' and '4' - as requested, onto paper and cut out. I then pinned them onto their chosen fabric, cut out and stitched onto the door.
  10. Finally attach the curtains to the window frames along your velcro strip, hang the door from the central frame, open the curtains with your tiebacks and your home is ready!

As all the coloured pieces are attached using velcro the whole thing can be machine washed without the colours running. It's bound to get grubby with all the tea parties both on top of the house and inside. Though I've kept the house quite simple with its decoration I know over time I'll end up adding fabric window boxes and elaborate with fabric flowers growing up the side. The reverse side I may add a shop sign and make a larger door and fabric shelving for fabric fruit and veg. The table cloth works well because its so versatile so the more it can be the better!


Happy house making fun!


We have more Monday Makery craft & recipe ideas here.

If you would like to share some ideas as a guest blogger on the Monday Makery we would be very excited to hear from you. Use the contact form on our main website here.

For behind the scenes photos of Sisters Guild we have the gallery of the A-Z of Sisters Guild here.

www.sistersguild.co.uk


Friday, 12 August 2011

An A-Z of Sisters Guild: W

wonder/ˈwʌndə(r)/
noun
  • a feeling of surprise and admiration, caused by something beautiful, unexpected, or unfamiliar.
  • a person or thing that causes such a feeling.
    ■ [as modifier] having remarkable properties or abilities: a wonder drug.
verb
  • feel curious; desire to know.
    ■ used to express a polite question or request.
  • feel doubt.
  • feel wonder.


This is part of our 'An A-Z of Sisters Guild published every Friday. See also A is for adventure, B is for bedtime, C is for colour, D is for discovery, E is for exuberance, F is for Feminine, G is for glorious, H is for home , I is for imaginative , J is for Joie de Vivre, K is for kin  ,L is for Love , M is for Maternal , N is for Nurture  O is for Oneiric , P is for Play , Q is for Quirky , R is for Restful, , S is for Style, T is for Twitter
, U is for Unique and V is for Vide

We also publish other series in our blog including our Monday Makery, Tuesday brings 'The  Story Behind Our Collections' inviting you to take a closer look at the designers we house and why we chose them for the Sisters Guild boutique.  Wednesday we show you our favourite seasonal pieces and Thursdays is dedicated to the 'Art of Living' in which we share ideas and inspiration from places to visit, things to see and articles about things that enrich our lives.

www.sistersguild.co.uk

Thursday, 11 August 2011

The Art of Living: 3cs Potrait Project

I've been spending some time in my favourite part of the country recently, the west! I found out about this portrait project in Bath and want to share it with you. The 3CS project is an experiment by digital artist Tom Bagshaw who is attempting to produce 100 digital portrait studies in 100 hours, over 100 days.

The title 3CS is literally CCC, the roman numeral for 300 or 100, 100, 100.


On the 1st of September 2011, artist Tom Bagshaw will begin a unique project to create a portrait study in one hour, one every day, for one hundred days!

In order to accomplish this task he needs your help. He is asking for 100 willing participants to turn up at the Fine Art Print Company in Bath, UK at 12 noon on the 1st of September!

If you would like to in with a chance of having your portrait digitally painted, for free- the first 100 to arrive at FAPC will be asked to give their contact details and sign their understanding of the project then be invited to sit for a couple of quick photographic reference shots. They will then receive a ticket with a unique number relating to their position within the 100. When all the reference is collected and sorted the painting can begin!

The 3cs blog will serve as a place to see how things are going, with a collection of finished pieces being displayed together every 20 days or so.

Even if you do not live in the South West of England or even in the UK, you can still help by promoting the project on your website with a simple link to Toms blog and use of the twitter hashtag #3CS, the more people become aware of the project the more likely Tom will get the required 100 turn up for the photoshoot!

A little about the artist...
Tom Bagshaw is a commercial Illustrator and Digital Painter based near the Georgian City of Bath in the South West of England. He works under the moniker of Mostlywanted and is represented by the Central Illustration Agency. His talents are sought after by clients in fashion, advertising, editorial and publishing, and include The Daily Telegraph, Saatchi & Saatchi, Sony, the BBC, Kraft and GQ. He has recently started to exhibit his more painterly work and currently has a new body of work on show with the Corey Helford Gallery in LA. To view his work, please visit Mostlywanted.com and if you are interested in more of his creative process have a look at his blog: tombagshaw.blogspot.com

It's going to be exciting to see the portrait project evolve, especially to see people I know among the faces.

This is part of the Art of Living series of posts that bring you all the things we are passionate about and the things we discover in our lives as mamas.

In our Wednesday Woo blog post series we present a selection of things from the Sisters Guild Boutique.

We also have a Monday Makery with ideas for things to make yourself.

And for a glimpse behind the scenes of Sisters Guild we have the A-Z of Sisters Guild here 

www.sistersguild.co.uk

Wednesday, 10 August 2011

Wednesday Woo: More Belle & Boo

More Belle & Boo has arrived in the boutique.  We love receiving our packages from Belle & Boo, and it's lovely to share these things with you...
I have a space on my own wall reserved for the Family Tree Poster.  I't's a great project to involve the children and gather some family photos to sit among the branches.  It comes in 2 sizes, Medium £16.00 and Large £30.00
The Boo Bag is now available in 3 sizes: Small Boo £12,  Large Repeat Print Boo £15, Large Boo £14.  They are made of heavy cotton canvas with a long red strap and they all come with a surprise badge. Adorable!
We couldn't resist the Lost Cut Out Card £3.00, from one of our favourite Belle & Boo art prints Lost.  It would make a lovely gift or a an extra special greetings card.

The Dress-Up Belle Set £6.00, is one of those well-loved old fashioned playthings - a cardboard Belle Doll to dress in some beautiful outfits.  She is the same size as the doll at the back of the Bubbles Before Bed book making it a lovely gift if the 2 are bought together.

Enjoy stepping into the whimsical world of Belle & Boo


This is part of our Wednesday Woo blog post series where we present a selection of our favourite things from the Sisters Guild Boutique.

We also have a Monday Makery with ideas for things to make yourself.

The Art of Living posts bring you all the things we are passionate about and the things we discover in our lives as mamas.

www.sistersguild.co.uk

Sign up for future news & offers:

Tuesday, 9 August 2011

The Story Behind our Collections: Rosie Flo

The story behind Rosie Flo is one that came from a need and a passion and, most importantly, the influence of 2 little girls who loved colouring in.  It's a story that I can very much relate to!  When we were little my sisters & I would sit for hours with our colouring books and pens, and since then we have watched with warm smiles as our own children discover the joy of colouring in.  When we came across Rosie Flo colouring books some years ago our colouring-in sessions were taken to a whole new creative level.  It's made us get back into colouring-in ourselves as Rosie Flo is definitely for adults too!

In the world of Rosie Flo heads, arms and legs are missing and it is up to you to add these body parts, along with a rainbow of colour.


Roz Streeten 'invented' the Rosie Flo colouring books through hours of sitting and drawing with her daughters when they were small. Roz says: They gave me instructions as to what I must draw and each time I promptly obeyed.  Dresses were the most popular items demanded of me and Sophie (now 14) would then do the faces, arms and legs. We drew all different kinds of people; rich, poor, fat, thin, tall, short, old and young. Sasha (now 11) became obsessed with simply colouring-in.


When Roz drew for her girls she left out the arms, legs & heads to let them use their own imagination with faces and hairstyles. Roz realised that she was onto something as she saw how her girls became fascinated with this way of drawing and colouring and Roz knew that there must be other like minded girls around - she was absolutely right!


Roz combined the middle names of her 2 daughters and Rosie Flo was born.  Roz designed some lovely themes to choose from, no doubt inspired by her own children and family life.  You can choose from Animals, Holiday, Games, Kitchen, Garden, Music, Arty and Night-time.  There's a sticker book too, as we all know how irresistible and handy sticker books are!


Rosie Flo colouring books really are outstanding.  The paper quality is thick, unlike colouring books from our younger days where the paper was so thin the felt tips went through!  The books are also designed to last so they can be taken on journeys, be stuffed in backpacks and are strong enough to become creative keepsakes.  The illustrations themselves are beautiful and can be appreciated by younger and older children as well as adults.


Roz has also introduced Johnny Joes to appeal to boys - hurray we hear from mums with sons! There are posters and postcards too. The posters are big at 54 x 40 cm - you and your budding little designers can create a unique piece of artwork to give as a gift or keep and frame as a memento of your childs' unique imagination.

       
The postcards are a great way to share creativity.  They allow children to make a personalised greetings card with a unique design to send to friends and family. The Rosie Flo postcards were Winner of the Best New Product Children’s Award at Top Drawer 2010. Very well-deserved we say!

The Rosie Flo household is certainly a very creative one. With Roz's husband Steve Kamlish, who is also a graphic designer, they design and publish everything in-house and all the products are printed in the UK.

Here's the Rosie Flo family in action:


Roz and her family have brought something so unique and magical to the childrens market and we as mums are utterly grateful.  It's wonderful to have Rosie Flo and Johnny Joe in the Sisters Guild Boutique.

If you haven't discovered Rosie Flo yet, take a look here.  For those who already know the wonder of these colouring books we know you'll agree with us on how beautifully designed they are and how they are for us as well as the children!

"It's beautiful before it's filled in and even better once it's finished" Angels & Urchins magazine

"Great gift idea" Marie-Claire


This is part of our series of blogs where we share the story behind our collections; because the collections and their creators mean so much to us here at Sisters Guild we want to pass the story on.

We bring a new blog each day; other series of blogs include our 'Monday Makery' with ideas and 'how to's'  to make and bake with all the family, Wednesday we woo you with our favourite pieces from the boutique and its new arrivals, Thursday is all about the art of living; discovering places and sharing new treasures and Friday we bring you the 'A-Z of Sisters Guild' a collection of pictures that convey the life behind the boutique

You can Follow us on Twitter here ,like us on Facebook here and visit our rather marvellous boutique here

Sign up for future news & offers:

Monday, 8 August 2011

Monday Makery - Lollibops


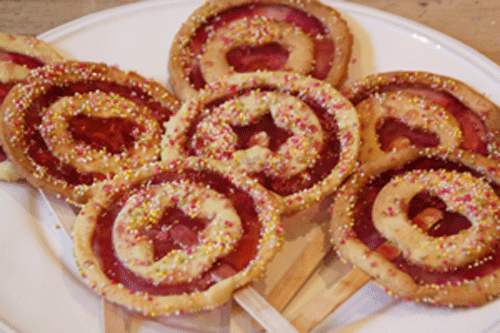
It's been a while since we've brought a recipe to the makery so in the spirit of Willie Wonka and with Lollibop in our minds we've been concocting lollipops with a twist. These are fantastic to make, with baking, bashing, and designing some bright stain glassed biscuit lollipops.
The smell of almond and lemon drifting through the house is pretty delicious too. These lollibops make great party bag treats and look pretty impressive on a party table too.

here's what you'll need:
  • wooden lollipop sticks
  • 200g individually wrapped sugar drops
  • hundreds and thousands
  • 125g unsalted butter - softened
  • 1 lemon
  • almond essence - 1 teaspoon
  • 110g caster sugar
  • 250g plain flour
  • 2 eggs
  • greaseproof paper
  • rolling pin


Here's how:
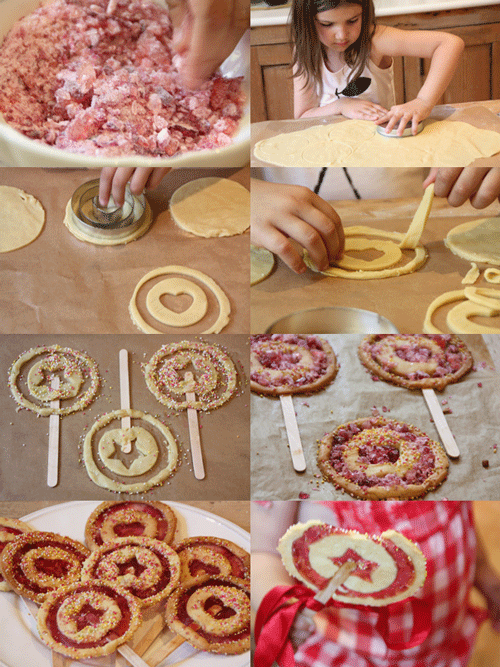
  1. To make the biscuit dough put the butter, 1tsp almond essence, 1 egg and the grated rind of one lemon into a bowl and mix it all up with an electric mixer, start adding the flour little by little sifting as you go. 
  2. Now you'll need to kneed; sprinkle an ample amount of flour over the table and kneed your dough adding more flour, sprinkle by sprinkle if it starts to get too sticky.
  3. Time to cool off; cut two sheets of grease proof paper and roll out your dough between the two sheets. Once its rolled evenly (about 1/2 centimetre thick) place in the fridge to cool for about half an hour.
  4. Whilst waiting for the dough, you can get bashing the sweets. Unwrap the sweets and separate by colour. Place the sweets into a sandwich bag, wrap in a tea towel and place on top of a chopping board (to protect your work surface) now take your rolling pin and bash bash bash with all your might! Repeat the process with all the different colours. 
  5. Preheat the oven to 180C or 160C fan assisted.
  6. Take your dough from the fridge and using the largest of your round cutter cut out as many rounds as fits onto the sheet of dough. You can re-roll the dough again to make more later.
  7. Move each round onto another baking sheet.
  8. Now using your other cutters place the second largest on top followed by the next largest and finally your centre circle, we used a heart for some of our centres and stars for others.
  9. Remove the dough from the first inner circle and then the dough from the middle. Leaving two rings within the whole circle. Repeat with the other rounds.
  10. Brush with egg white and sprinkle with hundreds and thousands then carefully slide a lollipop stick underneath and into the central space.
  11. Now pop into the oven for 10 minutes.
  12. Remove from the oven and fill the gaps with your bashed up sweets. Put them back into the oven for a further 5 minutes.
  13. Remove from the oven and leave to cool on the trays

I tied a ribbon around the stick to finish off the our lollibops. I think they look pretty yummy. The biscuit has a delicate lemon and almond taste and just the perfect crunch. The stained glass centre cracks in the mouth and the combination of the two is really delicious.

Happy baking! yum yum


We have more Monday Makery craft & recipe ideas here.

If you would like to share some ideas as a guest blogger on the Monday Makery we would be very excited to hear from you. Use the contact form on our main website here.

For behind the scenes photos of Sisters Guild we have the gallery of the A-Z of Sisters Guild here.

www.sistersguild.co.uk

Wednesday, 3 August 2011

Wednesday Woo: Japanese Paper Balloons

We have loved these paper balloons for a long time so it was inevitable that they would find their way into the Sisters Guild Boutique, from the lovely Petra Boase.

These creatures are very cute for a bedroom or for a children's party.  From £2.25 in the boutique here.

My favourite, more grown-up one is this flower ball:
image courtesy of Petra Boase

Made from bright, crisp environmental paper, they are a traditional paper balloon design from Japan . Each balloon comes flat and you simply blow in the hole to expand to its circular shape character .The balloons can be flattened and blown up over and over again.  A unique way to decorate and a lovely gift idea.

View the Japanese Paper Balloons collection here

This is part of our Wednesday Woo blog post series where we present a selection of our favourite things from the Sisters Guild Boutique.

We also have a Monday Makery with ideas for things to make yourself.

The Art of Living posts bring you all the things we are passionate about and the things we discover in our lives as mamas.

www.sistersguild.co.uk

Tuesday, 2 August 2011

The Story Behind our Collections: Renaissance Life

Discovering the Renaissance Life jewellery collection felt fated.  I was about to make my way home from a trade show and at the last minute decided to turn down one aisle, and there tucked away in a little corner was a little stand full of these enchanting pieces of jewellery that made my eyes widen with wonder. There I met Linnéa Götstav, the beautiful creator of the jewellery - we chatted away as I held each piece of jewellery, and I was completely charmed!

One of the first things that attracted me to Renaissance Life jewellery was how heavy and solid the pieces are. They are so amazing to hold and you honestly feel a certain magic when you wear them.

Jewellery is a very personal and beautiful way of expressing yourself.  A favourite piece of jewellery can evoke a time, a place or a feeling, it adds and allure to you and your day.  We all have an instinct to embellish ourselves - jewellery is decoration that can tell a story.  Each piece of Renaissance Life jewellery has a story, and it will appeal to people in different ways.

Renaissance Life is from Sweden and the jewellery they create is so unique with each piece having a special meaning, named after different years.  There's a timeless romance to the collection that draws people in.
The meanings behind the collections are taken from Swedish sayings, the past, present and the future together with dreams, time and illusion. Renaissance Life launches two new collections each year reflecting life on earth and our own possibilities.


Behind Renaissance Life is a team of creative people who believe in thinking freely, creative and without boundaries.  They seek to make good luck charms that will bring attention, awareness and good memories. They hope the jewellery will remind you of the important things in life.  In looking at the collection you can certainly see there's a lot of love and passion that has gone into the designs - stories inspired by people, relationships, history and landscape.

“You could have so much fun with these pieces and really make them your own, everything has a story behind it” Emma Sells, ELLE online


Year 1983 Swedish Russian Doll is a necklace from the Bird collection that takes it's inspiration from dreams, possibilities and happy summer days. The Swedish Russian doll is a very sweet and adventurous little doll. You have to open her layers to get to her perfect heart of silver.

Year 302 Ball with Swedish Stone is from the Ocean collection that takes it's inspiration from the future, endless possibilities and nature´s vibrations.  This large ball necklace contains a stone from the Swedish west-coast that will bring calm to you and make you feel open to life and what lies ahead.

Year 1970 Freedom Horse necklace is from the Bird collection that takes it's inspiration from dreams, possibilities and happy summer days. The Freedom horse is a Swedish horse that has jumped straight from 1970 to today with a beautiful free spirit that makes life more fun.  When you wear this you will surely feel your free spirit soar

Year 1952 secret heart is from the In Between collection that takes it's inspiration from hope, dreams and illusions. This necklace has a secret box where you can keep your cherished memories, a secret, a dream or a hope for the future.  A piece of jewellery that is so personal...only you or maybe one significant other will know what hides inside the heart.


"Jewellery is something more intimate and personal than just trends..It should become a part of yourself...It's not just something you put on.It gives you feeling for the day..." Linnéa Götstav, designer/founder - Renaissance Life


Discover the Renaissance Life pieces and be as charmed as we were when we first set eyes on them...


This is part of our series of blogs where we share the story behind our collections; because the collections and their creators mean so much to us here at Sisters Guild we want to pass the story on.

We bring a new blog each day; other series of blogs include our 'Monday Makery' with ideas and 'how to's'  to make and bake with all the family, Wednesday we woo you with our favourite pieces from the boutique and its new arrivals, Thursday is all about the art of living; discovering places and sharing new treasures and Friday we bring you the 'A-Z of Sisters Guild' a collection of pictures that convey the life behind the boutique

You can Follow us on Twitter here ,like us on Facebook here and visit our rather marvellous boutique here

Sign up for future news & offers:

Monday, 1 August 2011

Monday Makery - Montessori Number & Alphabet Branches


Our house is full of alphabets and numbers at the moment. Sophia is reading and writing and learning how words are put together. Oona is learning her numbers, understanding them and matching them to the appropriate number of objects, although most of the time she'll say there are six! Yes, a cat has six legs, so do spiders and sometimes even I seem to have grown a couple of extras. I think for her any number above three begins to merge into the same blur of six!
So I have been looking for ways in which we can incorporate their desire to learn but keep it playful. Then on a hunt for inspiration to find some sewing projects I came across what is perhaps the most fabulous sewing book I could have imagined. Growing Up Sew Liberated by Meg McElwee is a beautiful book with inspiring projects ranging from simple baby clothes, storage baskets, puppets, bibs and of course this genius idea here which I have adapted to suit my own children's ages.


I love the endless games that can be played, the feel of the little fabric patches and how irresistable they seem to be to young and curious minds.


Here I made an alphabet version for Sophia and a more basic number one for Oona. Follow the steps below and get creating your own. It may seem like a big project but once you get off the starting blocks you'll be finished in no time.


You'll need:
  • a large piece of  cotton/linen fabric for the number rectangles. 46 x 114.5 cm is the recommended but you'll obviously need a lot more to make the alphabet. I found a pair of unlined tab top curtains for less than £5 in a charity shop and used this to keep the cost of materials down. 
  • You'll need the same width and length again of wadding
  • scraps of fabric for making the numbers.
  • cotton and embroidery threads
  • a branch or as I've used here a bamboo pole easily found and garden centres.
  • wood glue though I can't see why super glue wouldn't work just as well.
  • scissors
  • paper and pen for creating the templates.
  • and then the marvel that is my hero - fabric glue.

here's how:

  1. Begin by cutting your fabric rectangles. For your nine numbers you'll need 18 5" x 4" rectangles. 
  2. Then get your numbers ready. The book provides a template to trace and cut but you can draw the numbers onto paper as I did for the letters in the alphabet. 
  3. Once you've got your paper numbers cut each out and pin to your fabric scraps and cut out.
  4. I used the modern marvel that is fabric glue to stick each of the numbers onto their own fabric rectangle then I embroidered with a simple stitch around each one to give it a clear edge which is nice for young children to trace with their fingers.
  5. Now for piecing the rectangles together: take your base fabric rectangle, place your wadding rectangle (cut the same 5" x 4" as the fabric rectangles) on top and then sandwich it all together with your prepared numbered rectangle. Sew together around the edge. The wadding I found in my local haberdashers was quite thick so I only used one layer when putting this together but you can add 2 layers of wadding if you prefer. For the alphabet version I discovered my sewing machine could easily do a pretty embroidery stitch so I gave the edges a pretty finish with a coloured embroidery stitch around their edges.
  6. Finish and tidy: you can cut the edges of your finished rectangles with pinking shears to prevent any fraying and you can use fabric glue to seal the edges together to create neat lines, I skipped this step as I quite liked the soft look of the layers on the sides.
Now you have your numbers its time to prepare the branch
  1. I bought plain clothes pegs from the local pound shop and then my girls had fun setting about painting them, mixing the colours to create their own tones from basic poster paint. Set aside to dry.
  2. Once the paint is dry decide on the spacing of your number rectangles along the branch by lining up the pegs against the stick.
  3. Using wood glue (follow the manufacturers instructions) fix the pegs to the stick. I found that by placing a magazine under the ends of the pegs as the glue dried allowed the pegs to dry flat against the bamboo pole, which means they'll hang perfectly and not tend to tilt toward the wall when hung.
  4. When the glue has dried use your string to hang the branch, be sure to hang it at a height that your children can easily reach by standing or sitting. 

Of course now that you have your branch you can make more numbers to place in a basket beside the branch, you can add a 0 (zero) so that older children can make 10's or perhaps an = , a - and a + for children who are beginning to get to grips with mathematics. 
For Sophia's alphabet branch I doubled up on the letters and placed them in a basket next to her branch and I think i'll need to add yet more vowels too, its surprising how many 'oo's' are used! 
As children are now learning to read and write by learning phonics I think I'll add the appropriate phonic sounds like 'oo', 'ae' 'ie' etc giving each phonic sound their own rectangle.


We've been enjoying our Montessori branches all week now and the girls are playing with them brilliantly. I spell out messages for Sophia when she's fallen asleep and she loves to read them when she wakes up. Oona thinks its quite funny that when a 6 stands on its head it turns to a 9 and she's already starting to recognize numbers in their written form. Sophia who is rather smug about being big sister and therefore is already confident with her numbers teaches Oona games by grouping a small number of objects together, counts them with Oona and then asks her to find the number that matches..... I hear quite a lot of loud applause and 'well done Oona' coming from her room. As we have double the amount of numbers we play 'pairs' by turning all the numbers over on the floor and taking it in turns to turn 2 over winning the pair if we find they match.
There are endless games and ways of learning with these branches and Meg McElwee offers ideas in her craft craft book too.


I shall be making everything that is in the book as everything is brilliant. My enthusiasm for creating far outweighs my abilities and this book sits perfectly with me. The ideas are genius but the method is gentle so I feel like a makery master with results like a pro! love it!

We have more Monday Makery craft & recipe ideas here.

If you would like to share some ideas as a guest blogger on the Monday Makery we would be very excited to hear from you. Use the contact form on our main website here.

For behind the scenes photos of Sisters Guild we have the gallery of the A-Z of Sisters Guild here.

www.sistersguild.co.uk

Friday, 29 July 2011

An A-Z of Sisters Guild - V

picture courtesy of jamarmstrong


Come this way. That way. لوك أت ذيس . 在这里 . Kyk. Come hither Venu ici. Gire a la izquierda. Hicयहाँ देखो The other wayYou are invited. Vide. Meneton. Kig. See. Follow. look. בדרך הזאת Hither. View.PreviewRead More. See here. Bu baxmaq. Come here. Over there. Blick. Edrych. приди сюда. 


vide /ˈvēdē/ verb 1. see, used especially to refer to parts of a text. 2. refer to; used to direct attention to a particular page, book etc...

This is part of our 'An A-Z of Sisters Guild published every Friday. See also A is for adventure, B is for bedtime, C is for colour, D is for discovery, E is for exuberance, F is for Feminine, G is for glorious, H is for home , I is for imaginative , J is for Joie de Vivre, K is for kin  ,L is for Love , M is for Maternal , N is for Nurture  O is for Oneiric , P is for Play , Q is for Quirky , R is for Restful, , S is for Style, T is for Twitter
and U is for Unique

We also publish other series in our blog including our Monday Makery, Tuesday brings 'The  Story Behind Our Collections' inviting you to take a closer look at the designers we house and why we chose them for the Sisters Guild boutique.  Wednesday we show you our favourite seasonal pieces and Thursdays is dedicated to the 'Art of Living' in which we share ideas and inspiration from places to visit, things to see and articles about things that enrich our lives.

www.sistersguild.co.uk

Thursday, 28 July 2011

The Art of Living: Granny's Bookcase

We are currently staying at Granny's house and spending time rediscovering the bookshelf.  It's amazing to share my childhood books with my son and to journey back to a time when I would sit for hours and ponder over the pictures.  Looking at them again takes me right back as I recall the emotions they evoked and the dreams they inspired.

As children we were always given books as gifts, for which I am so grateful. We also visited the library regularly and we would buy books in the library sales as well as charity shops - something I still do now.  Some of these books still have the library stamp and '25p' felt-tipped on them, along with our own scribbles, grubby marks and food stains, which make them all the more precious relics of the past.

The Hare and the Tortoise based on a fable by La Fontaine, illustrated by Brian Wildsmith, 1966

Brian Wildsmith is one of my favourite Children's Illustrators. He uses pencil chalk, pastel, watercolour and ink to create the most vivid pictures full of nature and movement.  The details of the animals, the meadow grasses and flowers are so beautiful and full of warmth and wonder.  This one has become Gabe's new favourite, for the story as well as the pictures.

The Lazy Bear, Brian Wildsmith, 1973
The Lazy Bear is a great story about friendship with animals drawn in such detail, and a landscape so colourful it stays etched in your mind.

Teddybears 1 to 10 by Susanna Gretz, 1969
This Teddybears book is so memorable mainly because as a child I was quite concerned for the bears as they spun round the washing machine and were pegged out to dry!

Thumbelina, based on the story by Hans Christian Anderson, Illustrated by Elsa Beskow, 1979
 Thumbelina is one of the Hans Christian Anderson stories of which I am most fond, due to having this book read to me from a young age.  I was fascinated by how the tiny girl saved a birds life and who in turn saves her!  The images are so delicate and nostalgic.

The Ships Cat by Alan Aldridge and Richard Adams, 1977
The pictures in The Ships Cat are so vivid in my memory but I couldn't tell you what the story is about.  Reading it now it is quite an unusual story written in verse, it feels more like a grown-up book than a childs.  My own 3 year old is now fascinated by the pictures as I was.  The one that I remember filling me with terror as a child was the one above of the cat chained up in the dungeon - quite macabre!

The Butterfly Ball and the Grasshopper's Feast by Alan Aldridge and William Plomer, 1973
The Butterfly Ball is another book that I remember clearly as I was completely beguiled by the imagery.  The amazing creature creations are the stuff of dreams, they would make a fantastic animation. As a child I studied all the detail of the elaborate clothing and acessories the creatures wore, and the scenes full of wonder. Apparently the book won the Whitbread Children's Book of the Year award on its release in 1973 - it surely is a classic of the 70's. 

Cannonball Simp by John Birmingham, 1966
John Birmingham is another of my favourite childrens illustrators and I'm always on the lookout for his books for Gabe.  Cannonball Simp is about an ugly little dog who is abandoned.  There's a picture of the abandoned dog that I remember making me feel quite sad - and it still does!  But then the dog finds a friend, a circus clown who is equally lonely.  Together they make an impressive team.  One of the pictures that I loved - so much so that I coloured it all in - is the one above of the party.  It was probably the big cake that appealed!

Joseph's Yard by Charles Keeping, 1969
These two books by Charles Keeping were ones that appealed to me as a curious and thoughtful child.  Maybe because the stories scared me a little.  Joseph's Yard is about destroying something you love and I remember feeling the anguish of the boy.  The images are very powerful with scrawls of ink and colour washes - they are full of all the elements and express so well the emotions of the story.

Wasteground Circus by Charles Keeping, 1975
The Wasteground Circus is about how a desolate urban landscape is taken over by a circus and how the boys discover so much life and colour.  The book used to fill me with fear and fascination maybe as it was set in the city and it was about 2 boys who looked quite cool!  As you turn each page a rainbow of colour evolves until the boys return to their black and white landscape.

Do any of you remember these books from your childhood? What are the books with stories or imagery that have lingered in your mind?  And do you still have copies of them?  Do share them with us here.

This is part of the Art of Living series of posts that bring you all the things we are passionate about and the things we discover in our lives as mamas.

In our Wednesday Woo blog post series we present a selection of things from the Sisters Guild Boutique.

We also have a Monday Makery with ideas for things to make yourself.

And for a glimpse behind the scenes of Sisters Guild we have the A-Z of Sisters Guild here 

www.sistersguild.co.uk